
Building an ROI calculator for your product or service is a great lead generation tactic. Whether your calculator is geared towards ROI, pricing or something else, you can provide a high level of transparency of what your product or service will mean to their bottom line.
Although it can seem like a straightforward process, there are many questions to answer to configure the calculator around the specific needs of your business.
- What happens when the form is submitted?
- Where do the results and input variables go?
- And are they stored in such a way that they can be easily analyzed or further processed?
Storing the results and variables in your HubSpot CRM can be beneficial, enabling you to confirm their inputs in a follow-up email or provide their inputs to your sales team to inform their future conversations. What’s the best way to build a better HubSpot Form Calculator that boosts ROI and integrates with HubSpot’s CRM? Here’s how.
Gating Your Calculator
ROI calculators can be a great lead generation tactic, so deciding when to ask for a user's contact information is an important decision to make. Do you only want to show the calculator's result if users agree to provide contact information? It’s true that this might scare some people off and cost you a lead, but those who do provide the information will certainly be higher quality leads. The important thing to do here is to make sure the tool is providing real value. Not just, “give me your annual revenue and I’ll show you how I can increase your ROI.” Think hard about the variables you are asking for and provide help along the way using tooltips and/or estimated or default values.
This brings us to the form design itself. It’s important to design your calculator in a way that makes people want to interact with it. Iconography, a mix of form field styles, different steps, et cetera, will help increase the likelihood that someone will be receptive to completing your form. HubSpot forms have many good qualities, but can be a bit rigid when it comes to customization. In all likelihood, you'll want to create a form using your own HTML so you can have control over how it looks and functions.
Some fields could be built using HubSpot’s calculated properties, but realistically most calculators we build require a lot more complicated logic than HubSpot’s basic calculation properties can handle.
Step 1: Create Your HubSpot Form
As discussed above, we want full control over the UI, so all that’s going to be needed when creating your initial HubSpot form is the name and email fields.
As an example for this tutorial, we’re going to build a pricing calculator where the visitor is also asked to input the amount of widgets they need every month. This input will not be a HubSpot form field. Rather, it will be part of a separate custom form that we'll use to feed our HubSpot form via JavaScript.
After filling out the widget field, the user is going to be asked for their email address. And upon hitting submit they will see their price. Both the widgets and price will get stored in their contact record.
Step 2: Decide How to Store Your Data
Once you’re ready to build, think about what you want to store. This comes down to how the information is going to help you and your sales team to respond to the lead. You may only be interested in the result of the calculation (i.e. the price or ROI), but when you communicate this back to the prospect it would build more trust if you can step through the calculation with them and talk through what variables you could help improve and how. In our case, since there’s only three data points (widgets, price and widgets cost), we’ll store all of them.
Step 3: Create New Properties and Add to Your Form
We suggest creating a new property group for the ROI calculator data you are going to store. It will make it a lot easier when adding the fields to your form, combing through a contact record or searching for tokens to drop in a followup email.
After creating the property group and properties that live within, we'll add these new fields to our HubSpot form and mark them as "hidden." The field types (text, number, et cetera) will depend on the data you are passing in and how you’d like to present it. We prefer to use text fields so we can format the numbers in such a way that they present better in an email.
If you’re using the data for list building criteria, however, you may want to use number fields. For example, if you’re segmenting your leads by the amount of widgets needed, you’ll want that data in number format so you can apply logic to it. Of course, there’s no reason you can’t have a text field for presentation and a number field for creating lists.
Step 4: Embed Your Form in Your Website
In order to interact with the HubSpot form, we’re going to need to either use the form embed code, so we can make use of the onFormSubmit callback function, or we can use a HubL form field and drop our JavaScript in using global form events.
Personally, I like the former method, which gives you more control over everything. But it’s not necessary. A case for using global form events is for custom submit code you plan to use across different forms. A quick use case would be a form with a custom redirect that will be used on your landing pages. Here’s a couple examples of how our calculator/form will look using both methods.
Using the embed code
<script>
hbspt.forms.create({
region: "na1",
portalId: "XXXXXX",
css: "",
formId: "f8299b41-c2ec-4179-b8d2-494baaf60bd0",
onFormSubmit: function($form) {
// pricing calculator code will go here
}
});
</script>
Using a global form event
window.addEventListener('message', event => {
   if(event.data.type === 'hsFormCallback' &&
   event.data.eventName === 'onFormSubmit') {
       // pricing calculator code will go here
   }
});
Step 5: Enhance Your Form Code with JavaScript
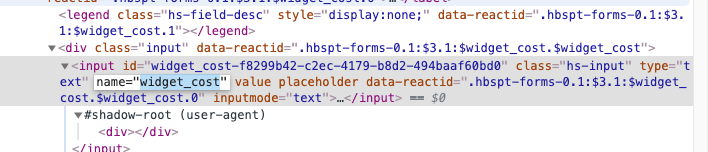
Now for the actual JavaScript. The ease of this process depends upon the complexity behind the calculation, not moving data to the HubSpot form. For that, it’s as simple as determining what the input field “names” are, which you can do by drilling into them in the property settings or just inspecting the form and grabbing the “name” attribute for each field. Then it’s as simple as setting a variable for that field and updating it. Using our example, I’m going to leave the form fields visible and inspect them to grab their name attribute. (This can also be done by hovering over the property name in your property settings.) In the screenshot below you can see the "name" attribute for our Widget Cost field.
Now we’re going to use some jQuery (vanilla is obviously fine too, if you’re not into the whole brevity thing) to move the calculator data to our HubSpot form. And we’ll do so on submit.
<form>
<input id="widgets" type="text" placeholder="enter widgets">
</form>

<script>

  hbspt.forms.create({
	region: "na1",
	portalId: "XXXXXX",
        css: "",
	formId: "f8299b41-c2ec-4179-b8d2-494baaf60bd0",
        onFormSubmit: function($form) {
        // pricing calculator code will go here
        const widgets = parseInt($('input#widgets').val());
        const price = widgets * 50;
        $('input[name="widgets"]').val(widgets).change();
        $('input[name="widget_cost"]').val(50).change();
        $('input[name="calculated_price"]').val(price);
  }
});

</script>
In the example above, there are two fields for "Widgets." One standalone field and one as a hidden field in the Hubspot form. As discussed above, the reason for this was so we can use our own html to have complete control over it. When the form is submitted, the value from the non-HubSpot form field is passed through our calculation and the hidden HubSpot fields are then updated.
Step 6: Review the Submission Details
Let's take a peak at what a submission looks like.
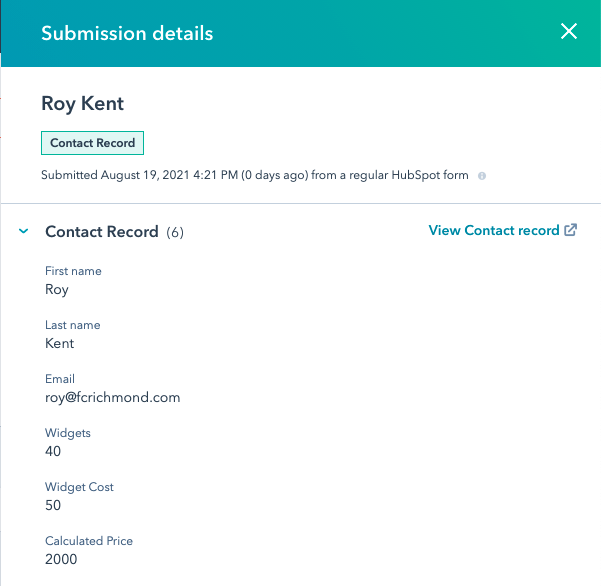
As you can see, our contact (Roy Kent) requested the price for 40 widgets. Since Widgets, Widget Cost and Calculated Price are now properties in Roy's contact record we can use these like we would any other contact property (list building criteria, workflow logic, email personalization tokens, etc.).
Step 7: Add in Some Complexity
Here are some ideas for more complex calculations. We recently built an energy pricing calculator that relied on external inputs. In this case, the client wanted control over the inputs so we created a series of HubDB tables for them to manage and queried those based on the user provided input. This calculation was also proprietary, so we had to build it into a serverless function so the math couldn’t be accessed.
Side note, this calculation was insanely complicated. However, it was all built out in an excel file and for the most part, excel functions and JavaScript functions are very similar, if not identical. Obviously, the syntax is different but I’ve found by naming my JavaScript variables the same as cells in a spreadsheet (i.e. C52) I don’t get lost and can copy paste a lot of the formulas into my JavaScript.
Want to add a lead generating ROI calculator to your company website?
Reach out and let's get the conversation started.
Posted In: Web Development, Lead Generation, HubSpot CMS

Derick Beauregard
When you’re looking for a HubSpot pro, look no further than Derick. He’s as comfortable surfing HTML as he is surfing the cold New England water year-round. As Director of Web Production at Beacon Digital with ample knowledge of HTML, CSS, JavaScript/jQuery, HubL, and the HubSpot API, Derick’s skills are put to good use building websites in the HubSpot CMS. He loves finding efficient, scalable, and accessible solutions for clients who may have little to no experience coding.